Wednesday, April 25, 2012

New Essay: Caret Navigation in Web Applications

For those of you who don't follow me on Twitter, yesterday I announced a new essay: Caret Navigation in Web Applications. There I talk about some of the things that I worked hard to get right when implementing the UI for Google Tasks.

This essay may not be for JavaScript lightweights, though it didn't seem to gain much traction on Hacker News or on Reddit (which is particularly sad because Reddit readers were much of the reason that I took the time to write it in the first place). I suppose it would have been more popular if I had made it a lot shorter, but I believe it would have been much less useful if I did. That's just my style, I guess: Closure: The Definitive Guide was originally projected to be 250-300 pages and it ended up at 550.

I also wanted to take this opportunity to make some more comparisons about Google Tasks vs. Asana that weren't really appropriate for the essay:

  • It's annoying that Asana does not support real hierarchy. Asana has responded to this on Quora, but their response is really about making Asana's life easier, not yours. What I think is really interesting is that if they ever decide to reverse their decision, it will really screw with their keyboard shortcuts since they currently heavily leverage Tab as a modifier, but that may not work so well when users expect Tab to indent (and un-indent).
  • It's pretty subtle, but when you check something off of your list in Google Tasks, there is an animated strikethrough. I did this by creating a timing function that redraws the task with the </s> in an increasing position to achieve the effect. This turned out to be tricky to get right because you want the user to be able to see it (independent of task text length) without it feeling slow for long tasks. Since so many people seem to delight in crossing things off their list, this always seemed like a nice touch in Google Tasks. I don't find crossing things off my list in Asana as satisfying.
  • Maybe I haven't given it enough time yet, but I have a lot of trouble with Asana's equivalent of the details pane. The thing seems to slide over when I don't want it to, or I just want to navigate through my tasks and have the details pane update and it starts bouncing on me...I don't know. Am I alone? In Tasks, it's shift-enter to get in and shift-enter to get out. It's not as sexy since there's no animation, but it's fast, it works, and it doesn't get in my way.

Finally, some friends thought I should include a section in the essay about "what browser vendors can do to help" since clearly the browser does not have the right APIs to make things like Google Tasks easy to implement. As you may imagine, I was getting pretty tired of writing the essay, so I didn't include it, but this is still an important topic. At a minimum, an API to return the current (x, y) position of the cursor as well as one to place it at an (x, y) position would help, though even that is ambiguous since a cursor is generally a line, not a point. It would be interesting to see how other UI toolkits handle this.

Oh, and I should mention that if I were to reimplement Google Tasks again today, I would not implement it the way that I did, if I had enough resources. If you look at Google Docs, you will see that your cursor is not a real cursor, but a blinking <div>. That means that Docs is taking responsibility for turning all of your mouse and keyboard input into formatted text. It eliminates all of the funny stuff with contentEditable by basically rebuilding...well, everything related to text editing in the browser. If I had libraries like that to work with (that already have support for pushing changes down to multiple editors in real time), then I would leverage those instead. Of course, if you don't have code like that available, then that is a pretty serious investment to make. Engineering is all about picking the right tradeoffs!

Want to learn more the technologies used to build Google Tasks? Pick up a copy of my new book, Closure: The Definitive Guide (O'Reilly).

Friday, October 28, 2011

I want a magical operator to assuage my async woes (and a pony)

Lately, I have spent a lot of time thinking about how I could reduce the tedium of async programming in JavaScript. For example, consider a typical implementation of using an XMLHttpRequest to do a GET that returns a Deferred (this example uses jQuery's implementation of Deferred, but there are many other reasonable implementations, and there is a great need to settle on a standard API, but that is a subject for another post):
/** @return {Deferred} */
var simpleGet = function(url) {
  var deferred = new $.Deferred();

  var xhr = new XMLHttpRequest();
  xhr.onreadystatechange = function() {
    if (xhr.readyState == 4) {
      if (xhr.status == 200) {
        deferred.resolve(xhr.responseText);
      } else {
        deferred.reject(xhr.status);
      }
    }
  };
  xhr.open('GET', url, true /* async */);
  xhr.send(null);  

  return deferred;
};
What I want is a magical ~ operator that requires (and understands) an object that implements a well-defined Deferred contract so I can write my code in a linear fashion:
/** @return {Deferred} */
var getTitle = function(url) {
  if (url.substring(0, 7) != 'http://') url = 'http://' + url;
  var html = ~simpleGet(url);
  var title = html.match(/<title>(.*)<\/title>/)[1];
  return title;
};

/** Completes asynchronously, but does not return a value. */
var logTitle = function(url) {
  try {
    var title = ~getTitle(url);
    console.log(title);
  } catch (e) {
    console.log('Could not extract title from ' + url);
  }
};
Unfortunately, to get this type of behavior today, I have to write something like the following (and even then, I am not sure whether the error handling is quite right):
/** @return {Deferred} */
var getTitle = function(url) {
  if (url.substring(0, 7) != 'http://') url = 'http://' + url;

  var deferred = new $.Deferred();
  
  simpleGet(url).then(function(html) {
    var title = html.match(/<title>(.*)<\/title>/)[1];
    deferred.resolve(title);
  }, function(error) {
    deferred.reject(error);
  });

  return deferred;
};

/** Completes asynchronously, but does not return a value. */
var logTitle = function(url) {
  var deferred = getTitle(url);
  deferred.then(function(title) {
    console.log(title);
  }, function(error) {
    console.log('Could not extract title from ' + url);
  })
};
I am curious how difficult it would be to programmatically translate the first into the second. I spent some time playing with generators in Firefox, but I could not seem to figure out how to emulate my desired behavior. I also spent some time looking at the ECMAScript wiki, but it is unclear whether they are talking about exactly the same thing.

In terms of modern alternatives, it appears that C#'s await and async keywords are the closest thing to what I want right now. Unfortunately, I want to end up with succinct JavaScript that runs in the browser, so I'm hoping that either CoffeeScript or Dart will solve this problem, unless the ECMAScript committee gets to it first!

Please feel free to add pointers to related resources in the comments. There is a lot out there to read these days (the Dart mailing list alone is fairly overwhelming), so there's a good chance that there is something important that I have missed.

Update (Fri Oct 28, 6:15pm): I might be able to achieve what I want using deferred functions in Traceur. Apparently I should have been looking at the deferred functions strawman proposal more closely: I skimmed it and assumed it was only about defining a Deferred API.

Want to learn about a suite of tools to help manage a large JavaScript codebase? Pick up a copy of my new book, Closure: The Definitive Guide (O'Reilly), and learn how to build sophisticated web applications like Gmail and Google Maps!

Tuesday, August 2, 2011

An Examination of goog.base()

A few weeks ago, I started working on adding an option to CoffeeScript to spit out Closure-Compiler-friendly JavaScript. In the process, I discovered that calls to a superclass constructor in CoffeeScript look slightly different than they do in the Closure Library. For example, if you have a class Foo and a subclass Bar, then in CoffeeScript, the call [in the generated JavaScript] to invoke Foo's constructor from Bar's looks like:
Bar.__super__.constructor.call(this, a, b);
whereas in the Closure Library, the canonical thing is to do the following, identifying the superclass function directly:
Foo.call(this, a, b);
The two are functionally equivalent, though CoffeeScript's turns out to be slightly simpler to use as a developer because it does not require the author to know the name of the superclass when writing the line of code. In the case of CoffeeScript, where JavaScript code generation is being done, this localization of information makes the translation of CoffeeScript to JavaScript easier to implement.

The only minor drawback to using the CoffeeScript form when using Closure (though note that you would have to use superClass_ instead of __super__) is that the CoffeeScript call is more bytes of code. Unfortunately, the Closure Compiler does not know that Bar.superClass_.constructor is equivalent to Foo, so it does not rewrite it as such, though such logic could be added to the Compiler.

This piqued my curiosity about how goog.base() is handled by the Compiler, so I ended up taking a much deeper look at goog.base() than I ever had before. I got so caught up in it that I ended up composing a new essay on what I learned: "An Examination of goog.base()."

The upshot of all this is that in my CoffeeScript-to-Closure translation code, I am not going to translate any of CoffeeScript's super() calls into goog.base() calls because avoiding goog.base() eliminates a couple of issues. I will still use goog.base() when writing Closure code by hand, but if Closure code is being autogenerated anyway, then using goog.base() is not as compelling.

Finally, if you're wondering why I started this project a few weeks ago and have not made any progress on the code since then, it is because I got married and went on a honeymoon, so at least my wife and I would consider that a pretty good excuse!

Want to learn more about Closure? Pick up a copy of my new book, Closure: The Definitive Guide (O'Reilly), and learn how to build sophisticated web applications like Gmail and Google Maps!

Friday, July 1, 2011

Writing useful JavaScript applications in less than half the size of jQuery

Not too long ago, I tried to bring attention to how little of the jQuery library many developers actually use and argue that frontend developers should consider what sort of improvements their users would see if they could compile their code with the Advanced mode of the Closure Compiler. Today I would like to further that argument by taking a look at TargetAlert, my browser extension that I re-released this week for Chrome.

TargetAlert is built using Closure and plovr using the template I created for developing a Chrome extension. The packaged version of the extension includes three JavaScript files:

Name Size (bytes) Description
targetalert.js 19475 content script that runs on every page
options.js 19569 logic for the TargetAlert options page
targetalert.js 3590 background page that channels information from the options to the content script
Total 42634  

By comparison, the minified version of jQuery 1.6 is 91342 bytes, which is more than twice the size of the code for TargetAlert. (The gzipped sizes are 14488 vs. 31953, so the relative sizes are the same, even when gzipped.)

And to put things in perspective, here is the set of goog.require() statements that appear in TargetAlert code, which reflects the extent of its dependencies:
goog.require('goog.array');
goog.require('goog.dispose');
goog.require('goog.dom');
goog.require('goog.dom.NodeIterator');
goog.require('goog.dom.NodeType');
goog.require('goog.dom.TagName');
goog.require('goog.events');
goog.require('goog.events.EventType');
goog.require('goog.string');
goog.require('goog.ui.Component');
goog.require('goog.Uri');
goog.require('soy');
I include this to demonstrate that there was no effort to re-implement parts of the Closure Library in order to save bytes. On the contrary, one of the primary reasons to use Closure is that you can write code in a natural, more readable way (which may be slightly more verbose), and make the Compiler responsible for minification. Although competitions like JS1K are fun and I'm amazed to see how small JS can get when it is hand-optimized, even the first winner of JS1K, Marijn Haverbeke, admits, "In terms of productivity, this is an awful way of coding."

When deploying a packaged browser extension, there are no caching benefits to consider: if your extension includes a copy of jQuery, then it adds an extra 30K to the user's download, even when gzipped. To avoid this, your extension could reference https://ajax.googleapis.com/ajax/libs/jquery/1.6.1/jquery.min.js (or equivalent) from its code, but then it may not work when offline. Bear in mind that in some parts of the world (including the US! think about data plans for tablets), users have quotas for how much data they download, so you're helping them save a little money if you can package your resources more efficiently.

Further, if your browser extension has a content script that runs on every page, keeping your JS small reduces the amount of code that will be executed on every page load, minimizing the impact of your extension on the user's browsing experience. As users may have many extensions installed, if everyone starts including an extra 30K of JS, then this additional tax can really start to add up! Maybe it's time you gave Closure a good look, if you haven't already.

Want to learn more about Closure? Pick up a copy of my new book, Closure: The Definitive Guide (O'Reilly), and learn how to build sophisticated web applications like Gmail and Google Maps!

Monday, June 27, 2011

The Triumphant Return of TargetAlert!

About seven years ago, my adviser and I were sitting in his office Googling things as part of research for my thesis. I can't remember what we were looking for, but just after we clicked on a promising search result, the Adobe splash screen popped up. As if on cue, we both let out a groan in unison as we waited for the PDF plugin to load. In that instant, it struck me that I could build a small Firefox extension to make browsing the Web just a little bit better.

Shortly thereafter, I created TargetAlert: a browser extension that would warn you when you were about to click on a PDF. It used the simple heuristic of checking whether the link ended in pdf, and if so, it inserted a PDF icon at the end of the link as shown on the original TargetAlert home page.

And that was it! My problem was solved. Now I was able to avoid inadvertently starting up Adobe Reader as I browsed the Web.

But then I realized that there were other things on the Web that were irritating, too! Specifically, links that opened in new tabs without warning or those that started up Microsoft Office. Within a week, I added alerts for those types of links, as well.

After adding those features, I should have been content with TargetAlert as it was and put it aside to focus on my thesis, but then something incredible happened: I was Slashdotted! Suddenly, I had a lot more traffic to my site and many more users of TargetAlert, and I did not want to disappoint them, so I added a few more features and updated the web site. Bug reports came in (which I recorded), but it was my last year at MIT, and I was busy interviewing and TAing on top of my coursework and research, so updates to TargetAlert were sporadic after that. It wasn't until the summer between graduation and starting at Google that I had time to dig into TargetAlert again.

Though the primary reason that TargetAlert development slowed is that Firefox extension development should have been fun, but it wasn't. At the time, every time you made a change to your extension, you had to restart Firefox to pick up the change. As you can imagine, that made for a slow edit-reload-test cycle, inhibiting progress. Also, instead of using simple web technologies like HTML and JSON, Firefox encouraged the use of more obscure things, such as XUL and RDF. The bulk of my energy was spent on getting information into and out of TargetAlert's preferences dialog (because I actually tried to use XUL and RDF, as recommended by Mozilla), whereas the fun part of the extension was taking the user's preferences and applying them to the page.

The #1 requested feature for TargetAlert was for users to be able to define their own alerts (as it were, users could only enable or disable the alerts that were built into TargetAlert). Conceptually, this was not a difficult problem, but realizing the solution in XUL and RDF was an incredible pain. As TargetAlert didn't generate any revenue and I had other personal projects (and work projects!) that were more interesting to me, I never got around to satisfying this feature request.

Fast-forward to 2011 when I finally decommissioned a VPS that I had been paying for since 2003. Even though I had rerouted all of its traffic to a new machine years ago and it was costing me money to keep it around, I put off taking it down because I knew that I needed to block out some time to get all of the important data off of it first, which included the original CVS repository for TargetAlert.

As part of the data migration, I converted all of my CVS repositories to SVN and then to Hg, preserving all of the version history (it should have been possible to convert from CVS to Hg directly, but I couldn't get hg convert to work with CVS). Once I had all of my code from MIT in a modern version control system, I started poking around to see which projects would still build and run. It turns out that I have been a stickler for creating build.xml files for personal projects for quite some time, so I was able to compile more code than I would have expected!

But then I took a look at TargetAlert. The JavaScript that I wrote in 2004 and 2005 looks gross compared to the way I write JavaScript now. It's not even that it was totally disorganized -- it's just that I had been trying to figure out what the best practices were for Firefox/JavaScript development at the time, and they just didn't exist yet.

Further, TargetAlert worked on pre-Firefox 1.0 releases through Firefox 2.0, so the code is full of hacks to make it work on those old versions of the browser that are now irrelevant. Oh, and what about XUL? Well, my go-to resource for XUL back in the day was xulplanet.com, though the site owners have decided to shut it down, which made making sense of that old code even more discouraging. Once again, digging into Firefox extension development to get TargetAlert to work on Firefox 4.0 did not appear to be much fun.

Recently, I have been much more interested in building Chrome apps and extensions (Chrome is my primary browser, and unlike most people, I sincerely enjoy using a Cr-48), so I decided to port TargetAlert to Chrome. This turned out to be a fun project, especially because it forced me to touch a number of features of the Chrome API, so I ended up reading almost all of the documentation to get a complete view of what the API has to offer (hooray learning!).

Compared to Firefox, the API for Chrome extension development seems much better designed and documented. Though to be fair, I don't believe that Chrome's API would be this good if it weren't able to leverage so many of the lessons learned from years of Firefox extension development. For example, Greasemonkey saw considerable success as a Firefox extension, which made it obvious that Chrome should make content scripts an explicit part of its API. (It doesn't hurt that the creator of Greasemonkey, Aaron Boodman, works on Chrome.) Also, where Firefox uses a wacky, custom manifest file format for one metadata file and an ugly ass RDF format for another metadata file, Chrome uses a single JSON file, which is a format that all web developers understand. (Though admittedly, having recently spent a bit of time with manifest.json files for Chrome, I feel that the need for my suggested improvements to JSON is even more compelling.)

As TargetAlert was not the first Chrome extension I had developed, I already had some idea of how I would structure my new extension. I knew that I wanted to use both Closure and plovr for development, which meant that there would be a quick build step so that I could benefit from the static checking of the Closure Compiler. Although changes to Chrome extensions do not require a restart to pick up any changes, they do often require navigating to chrome://extensions and clicking the Reload button for your extension. I decided that I wanted to eliminate that step, so I created a template for a Chrome extension that uses plovr in order to reduce the length of the edit-reload-test cycle. This enabled me to make fast progress and finally made extension development fun again! (The README file for the template project has the details on how to use it to get up and running quickly.)

I used the original code for TargetAlert as a guide (it had some workarounds for web page quirks that I wanted to make sure made it to the new version), and within a day, I had a new version of TargetAlert for Chrome! It had the majority of the features of the original TargetAlert (as well as some bug fixes), and I felt like I could finally check "resurrect TargetAlert" off of my list.

Except I couldn't.

A week after the release of my Chrome extension, I only had eight users according to my Chrome developer dashboard. Back in the day, TargetAlert had tens of thousands of users! This made me sad, so I decided that it was finally time to make the Chrome version of TargetAlert better than the original Firefox verison: I was finally going to support user-defined alerts! Once I actually sat myself down to do the work, it was not very difficult at all. Because Chrome extensions have explicit support for an options page in HTML/JS/CSS that has access to localStorage, building a UI that could read and write preferences was a problem that I have solved many times before. Further, being able to inspect and edit the localStorage object from the JavaScript console in Chrome was much more pleasant than mucking with user preferences in about:config in Firefox ever was.

So after years of feature requests, Target Alert 0.6 for Chrome is my gift to you. Please install it and try it out! With the exception of the lack of translations in the Chrome version of TargetAlert (the Firefox version had a dozen), the Chrome version is a significant improvement over the Firefox one: it's faster, supports user-defined alerts, and with the seven years of Web development experience that I've gained since the original, I fixed a number of bugs, too.

Want to learn more about web development and Closure? Pick up a copy of my new book, Closure: The Definitive Guide (O'Reilly), and learn how to build sophisticated web applications like Gmail and Google Maps!

Thursday, June 9, 2011

It takes a village to build a Linux desktop

tl;dr Instead of trying to build your own Ubuntu PC, check out a site like system76.com instead.

In many ways, this post is more for me than for you—I want to make sure I re-read this the next time I am choosing a desktop computer.

My Windows XP desktop from March 2007 finally died, so it was time for me to put together a new desktop for development. Because Ubuntu on my laptop had been working out so well, I decided that I would make my new machine an Ubuntu box, too. Historically, it was convenient to have a native Windows machine to test IE, Firefox, Chrome, Safari, and Opera, but Cygwin is a far cry from GNOME Terminal, so using Windows as my primary desktop environment had not been working out so well for me.

As a developer, I realize that my computer needs are different from an ordinary person's, but I didn't expect it would be so difficult to buy the type of computer that I wanted on the cheap (<$1000). Specifically, I was looking for:

  • At least 8GB of RAM.
  • A 128GB solid state drive. (I would have been happy with 64GB because this machine is for development, not storing media, but Jeff Atwood convinced me to go for 128GB, anyway.)
  • A video card that can drive two 24" vertical monitors (I still have the two that I used with my XP machine). Ideally, the card would also be able to power a third 24" if I got one at some point.
  • A decent processor and motherboard.
I also wanted to avoid paying for:
  • A Windows license.
  • A CD/DVD-ROM drive.
  • Frivolous things.
I did not think that I would need a CD-ROM drive, as I planned to install Ubuntu from a USB flash drive.

I expected to be able to go to Dell or HP's web site and customize something without much difficulty. Was I ever wrong. At first, I thought it was going to be easy as the first result for [Dell Ubuntu] looked very promising: it showed a tower starting at $650 with Ubuntu preinstalled. I started to customize it: upgrading from 4GB to 8GB of RAM increased the price by $120, which was reasonable (though not quite as good as Amazon). However, I could not find an option to upgrade to an SSD, so buying my own off of Newegg would cost me $240. Finally, the only options Dell offered for video cards were ATI, and I have had some horrible experiences trying to get dual monitors to work with Ubuntu and ATI cards in the past (NVIDIA seems to be better about providing good Linux drivers). At this point, I was over $1000, and was not so sure about the video card, so I started asking some friends for their input.

Unfortunately, I have smart, capable friends who can build their own machines from parts who were able to convince me that I could, too. You see, in general, I hate dealing with hardware. For me, hardware is simply an inevitable requirement for software. When software goes wrong, I have some chance of debugging it and can attack the problem right away. By comparison, when hardware goes wrong, I am less capable, and may have to wait until a new part from Amazon comes in before I can continue debugging the problem, which sucks.

At the same time, I realized that I should probably get past my aversion to dealing with hardware, so I started searching for blog posts about people who had built their own Ubuntu boxes. I found one post by a guy who built his PC for $388.95, which was far more than the Dell that I was looking at! Further, he itemized the parts that he bought, so at least I knew that if I followed his steps, I would end up with something that worked with Ubuntu (ending up with hardware that was not supported by Ubuntu was one of my biggest fears during this project). I cross-checked this list with a friend who had recently put together a Linux machine with an Intel i7 chip, and he was really happy with it, so I ended up buying it and the DX58SO motherboard that was recommended for use with the i7. This made things a bit pricier than they were in the blog post I originally looked at:

Motherboard Intel DX58SO Extreme Series X58 ATX Triple-channel DDR3 16GB SLI
$269.99
CPU Intel Core i7 950 3.06GHz 8M L3 Cache LGA1366 Desktop Processor
$234.99
RAM Corsair XMS3 4 GB 1333MHz PC3-10666 240-pin DDR3 Memory Kit for Intel Core i3 i5 i7 and AMD CMX4GX3M1A1333C9
(2x$39.99) $79.98
Case Cooler Master Elite 360 RC-360-KKN1-GP ATX Mid Tower/Desktop Case (Black)
$39.99
Hard Drive Crucial Technology 128 GB Crucial RealSSD C300 Series Solid State Drive CTFDDAC128MAG-1G1
$237.49
Power Supply Corsair CMPSU-750HX 750-Watt HX Professional Series 80 Plus Certified Power Supply compatible with Core i7 and Core i5
$109.99
Sales Tax $55.47
Total $1027.90

At this point, I should have acknowledged that what I had put together (on paper) was now in the price range of what I was originally looking at on Dell's web site. Unfortunately, I had mentally committed to being a badass and building a machine at this point, so I forged ahead with my purchase.

I also should have acknowledged that this list of parts did not include a video card...

In a few days, everything had arrived and I started putting everything together as best as I could figure out. I tried following the assembly instructions verbatim from the manuals, but that proved to be a huge mistake, as the suggested assembly order was not appropriate for my parts. For example, the case instructions recommended that I install the power supply first, then the motherboard, though that ended up making the SATA connectors inaccessible, so I had to remove the motherboard, then the power supply, plug in the SATA cables, and then put everything back together again. (This is one of many examples of exercises like this that I went through.)

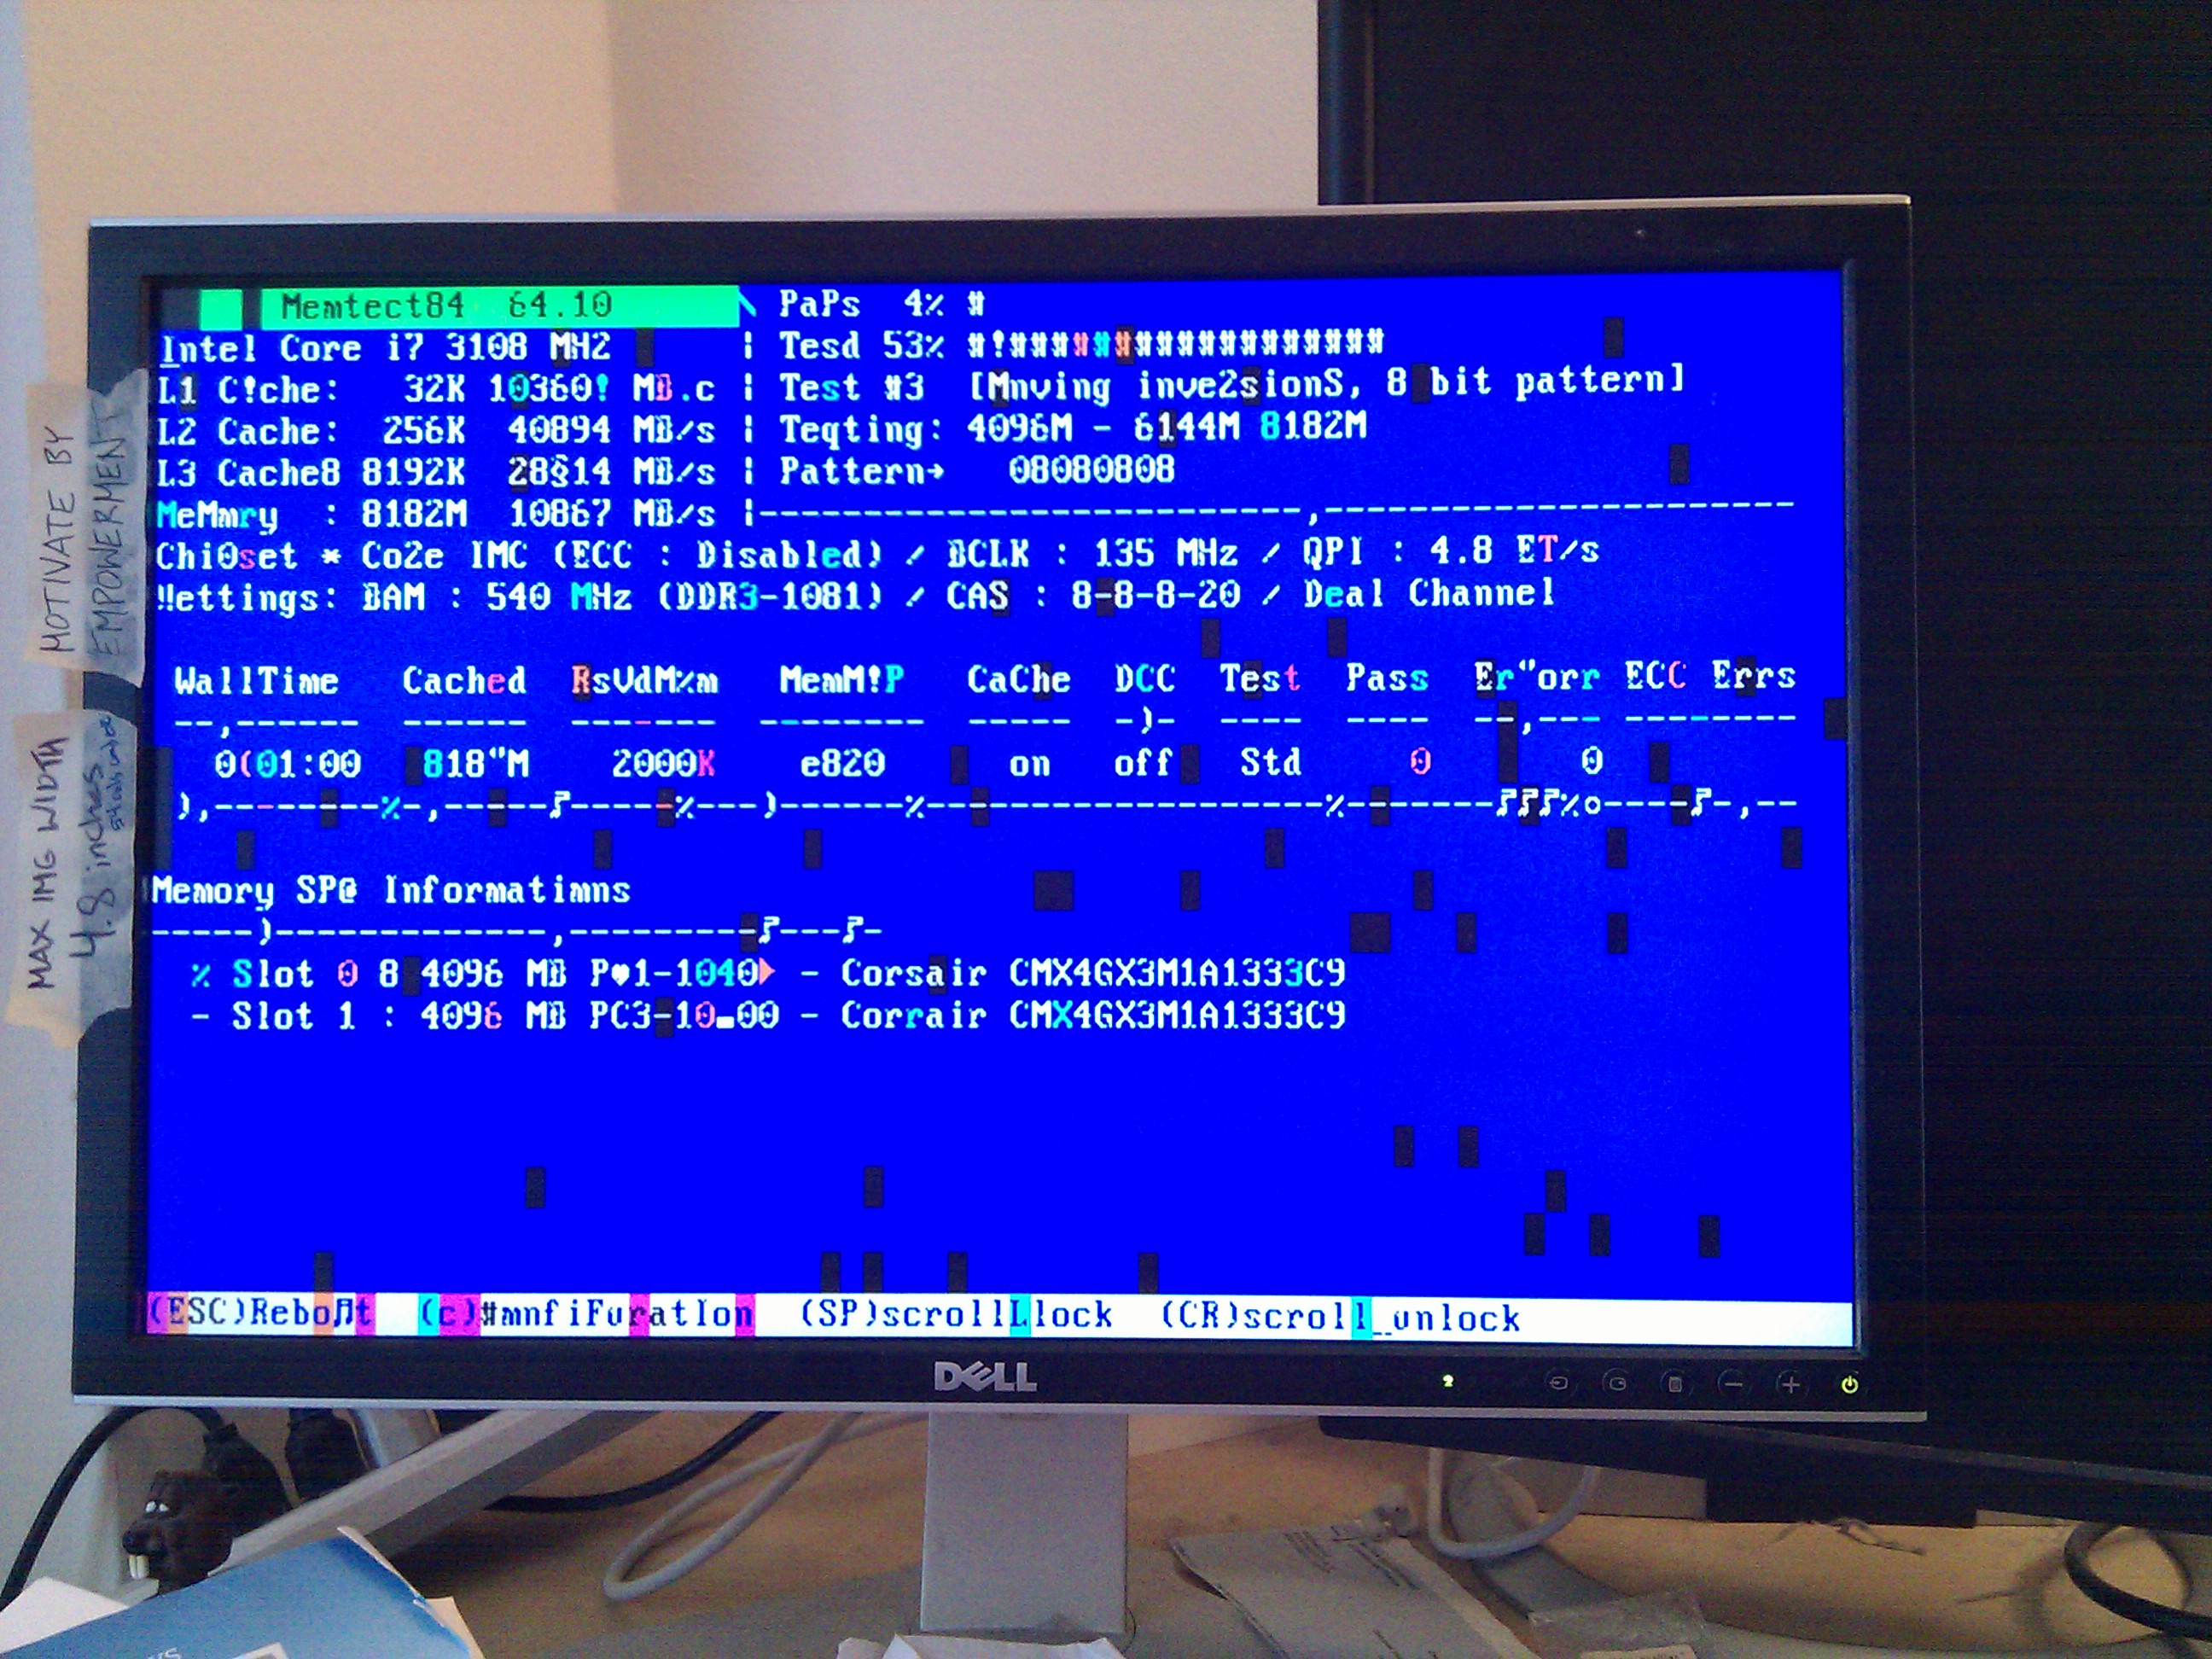
When I was close to having something that I thought would boot, I finally accepted the fact that I had failed to order a video card, so I tried using the one from my XP machine in hopes that it would allow me to kick off the Ubuntu installation process, and then I could walk to Best Buy to purchase a new video card. In the months leading up to the death of my XP machine, I had a lot of problems with my monitors, so it should have been no surprise that my installation screen looked like this:

Regardless, this allowed me to run the memory test (which runs forever, by the way—I let this run for hours before I decided to investigate why it never stopped) while I went off to Best Buy. Because I had already convinced myself that an NVIDIA card would work better with Ubuntu than an ATI, I went ahead and bought this badass looking video card: the EVGA GeForce GTX 550 Ti. It was not cheap ($250 at Best Buy, though it would have been $125 on Amazon), but I was a man on a mission, so nothing could stop me.

Once I got home and dropped the card in, I had a problem that I never would have anticipated: the video card did not fit in my case. Specifically, the card fit in my case, but it was so close to the power supply that there was not enough room to plug in the separate power connector that the video card needed. At that point, I was both desperate and determined, so I took out the power supply and tried to wrench off the casing to create a big enough hole so there would be enough room behind the video card to plug it in. As you can see, I did succeed in removing quite a bit of metal from the power supply (and most definitely voided the warranty):

Despite my handiwork with a pair of pliers, I was unable to remove enough metal from the power supply to create enough space to power the video card, so it would have to go back to Best Buy. I decided to search for [ubuntu 11.04 best video card] to find something that I could overnight from Amazon. I followed the links from this blog post, and decided to go with the ZOTAC nVidia GeForce 9800GT, which was $102.32 after tax and overnight shipping. One of the main selling points for me was the following comment in one of the Amazon reviews: "Another advantage of this card is that it DOES NOT require your power supply to have a video card power connector." Although I was originally hoping to get a card with two DVI inputs (instead of one DVI and one VGA), I really just wanted something that would work at that point.

While I was waiting for the new video card to arrive, I tried installing Linux on my SSD with my half-assed video card. Although it seemed like it was going to install off of the USB flash drive on Day 1, my PC did not seem to want to accept it on Day 2. I spent some time Googling for "@ogt error" that morning (because that is what I saw on my screen), until I realized that it was actually saying "boot error" and my video card was just garbling the characters. I rewrote the USB drive with all sorts of different ISOs, and I started to wonder whether buying the cheapest flash drive at Best Buy (it was $8 for 4GB!) was a mistake. I then tried the USB drive on another Windows machine I had lying around, and it took, at which point I was really stumped. Again, I asked some friends what they thought, and they recommended installing from a CD, as that was much more reliable.

As you may recall, buying a CD-ROM drive was something I had avoided, so what could I do? I tried reusing the one from my old Dell, but that turned out to be a non-starter because it required an IDE connector rather than a SATA one. Instead, I hoofed it back to Best Buy to "borrow" a drive for 24 hours or so. This was one of my better decisions during this entire process, as installing from a CD-R that I burned with an 11.04 ISO worked flawlessly.

Once my video card finally came in and Ubuntu was installed, I finally felt like I was almost done! Of course, I was wrong. Getting two 24" monitors working in portrait mode turned out to be quite a challenge. The first step was to install the NVIDIA drivers for Ubuntu. Originally I downloaded binaries from the web site, but that broke everything. Fortunately a friend helped me figure out how to uninstall the binary driver (sudo ./NVIDIA-Linux-x86_64-270.41.19.run --uninstall) and replace it with a proper package (sudo apt-get install nvidia-current). Now things were working fine with one monitor in landscape mode, but the jump to portrait was more challenging.

Initially, I tried to do everything through the NVIDIA GUI on Ubuntu, but it did not present an option to rotate the monitor. I found a blog post that recommended adding Option "Rotate" "CCW" to /etc/X11/xorg.conf, which indeed helped me get the first monitor working in portrait mode. I was able to add the second monitor via the NVIDIA GUI and edited xorg.conf again to rotate it. At this point, everything looked great except that I could not drag windows from one monitor to another. To do that, I had to enable "TwinView" in the NVIDIA GUI, which did enable me to drag windows across screens, except NVIDIA insisted that the cursor flow from the bottom of the left monitor to the top of the right monitor instead of horizontally across. I did many Google searches to try to find a simple solution, but I had no luck. Ultimately, I ended up reading up on xorg.conf until I understood it enough to edit it by hand to get things to work. At long last, everything was working!

The final step was to get everything in the case. This was a little tricky because my power supply came with a ton of cables, and wedging them in such that they did not block any of the three exposed fans was non-trivial. Further, the case did not have a proper slot for an SSD, so I ended up buying a 3.5 to 2 X 2.5-Inch Bay Converter to hold the SSD in place. Unfortunately, the case had weird screw holes such that it was impossible to secure the converter in place, but fortunately the top fan prevents the bay from falling into the rest of the case, so it seems good enough. Considering that I already have a power supply with a gaping hole in it and a mess of cables, this did not seem like my biggest concern.

So what have I learned? Primarily, I learned that I should never do this again, but if I had to, I would be much less afraid to mess with hardware the next time around. Including the cost of the video card and the bay converter, I spent $1138.92 in cash and about two days worth of my time. Most of that two days was spent being angry and frustrated. When I was just about finished with the entire project, I noticed an ad on one of the blog posts I used for help to a site I had not heard of before: system76.com. Apparently they sell Ubuntu laptops, desktops, and servers, and they have a product line called Wildebeest Performance that I could customize to basically exactly what I said I wanted at the outset of this project. On system76.com, a machine with Ubuntu 11.04, an i7 processor, 8GB of RAM, a 120GB SSD, and an NVIDIA card with two inputs (one DVI, one VGA) costs $1117.00, which is less than what I paid when buying the parts individually. Obviously buying the machine directly would have been a huge time savings, and I'm sure the inside of the system76 PC would not be nearly as sloppy as mine. In this, and in many other things, I need to have more patience and do more research before diving into a project. It can save a lot of time and sanity in the long run.

Friday, May 27, 2011

GData: I can't take it anymore

I have been playing with GData since I was on the Google Calendar team back in 2005/2006. My experiences with GData can be summarized by the following graph:


There are many reasons why GData continues to infuriate me:
  • GData is not about data—it is an exercise in XML masturbation. If you look at the content of a GData feed, most of the bytes are dedicated to crap that does not matter due to a blind devotion to the Atom Publishing Protocol. In recent history, GData has become better in providing clean JSON data, but the equivalent XML it sends down is still horrifying by comparison. I understand the motivation to provide an XML wire format, but at least the original Facebook API had the decency to use POX to reduce the clutter. Atom is the reason why, while I was at Google, the first GData JSON API we released had to have a bunch of dollar signs and crap in it, so that you could use it to construct the Atom XML equivalent when making a request to the server. When I wanted to add web content events to Calendar in 2006, most of my energy was spent on debating what the semantically correct Atom representation should be rather than implementing the feature. Hitching GData to the Atom wagon was an exhausting waste of time and energy. Is it really that important to enable users to view their updates to a spreadsheet in Google Reader?
  • REST APIs aren't cool. Streaming APIs are cool. If we want to have a real time Web, then we need streaming APIs. PubSub can be used as a stopgap, but it's not as slick. For data that may change frequently (such as a user's location in Google Latitude), you have no choice but to poll aggressively using a REST API.
  • GData has traditionally given JavaScript developers short shrift. Look at the API support for the GData Java client library or Python client library compared to the JavaScript client library. JavaScript is the lingua franca of the Web: give it the attention it deserves.
  • The notion of Atom forces the idea of "feeds" and "entries." That is fine for something like Google Calendar, but is less appropriate for hierarchical data, such as that stored in Google Tasks. Further, for data that does not naturally split into "entries," such as a Google Doc, the entire document becomes a single entry. Therefore, making a minor change to a Google Doc via GData requires uploading the entire document rather than the diff. This is quite expensive if you want to create your own editor for a Google Doc that has autosave.
  • Perhaps the biggest time sink when getting started with GData is wrapping your head around the authentication protocols. To play around with your data, the first thing you have to do is set up a bunch of crap to get an AuthSub token. Why can't I just fill out a form on code.google.com and give myself one? Setting up AuthSub is not the compelling piece of the application I want to build—interacting with my data is. Let me play with my data first and build a prototype so I can determine if what I'm trying to build is worth sharing with others and productionizing, and then I'll worry about authentication. Facebook's JavaScript SDK does this exceptionally well. After registering your application, you can include one <script> tag on your page and start using the Facebook API without writing any server code. It's much more fun and makes it easier to focus on the interesting part of your app.
If GData were great, then Google products would be built on top of GData. A quick look under the hood will reveal that no serious web application at Google (Gmail, Calendar, Docs, etc.) uses it. If GData isn't good enough for Google engineers, then why should we be using it?